环境准备
- 环境基于Ubuntu16.04
- Fabric version = 1.2.0
安装docker
apt-get install docker.io -y
安装docker-compose
apt-get install -y python-pip python-setuptools
pip install --upgrade pip
pip install docker-compose

curl -L --fail https://github.com/docker/compose/releases/download/1.19.0/run.sh -o /usr/local/bin/docker-compose
sudo chmod +x /usr/local/bin/docker-compose && sudo cp /usr/local/bin/docker-compose /usr/bin
docker-compose --version
docker-compose的最新版本可以在github找到。
安装go
wget http://p22qphkhy.bkt.clouddn.com/go1.10.linux-amd64.tar.gz
tar -C /usr/local -xzf go1.10.linux-amd64.tar.gz
vim /etc/profile

export GOROOT=/usr/local/go
export PATH=$PATH:$GOROOT/bin
export GOPATH=/opt/gopath

source  /etc/profile
go version
Nodejs
在全局下安装
npm install node-gyp
也可以比如在Ubuntu系统下执行
sudo apt-get install node-gyp
下载代码
创建fabric-sample项目的根路径,由于fabric的很多example项目基于Golang开发,因此建议是将Go路径设置在${GOPATH},然后创建如下路径
mkdir -p ${GOPATH}/src/github.com/hyperledger/ && cd ${GOPATH}/src/github.com/hyperledger/
克隆fabric-sample项目
git clone https://github.com/hyperledger/fabric-samples.git -b release-1.2 && cd fabric-samples/
安装fabric-tools及下载fabric-images
进入到fabric-sample目录下进行fabric-tools的安装和fabric-images的下载
curl -sSL https://raw.githubusercontent.com/hyperledger/fabric/master/scripts/bootstrap.sh | bash -s 1.2.0
执行完成之后,fabric-sample下会多出一个bin目录,这个目录下面包含了fabric-tools,可以将这个bin文件夹添加到环境变量中
vim /etc/profile

---
export PATH=$GOPATH/src/github.com/hyperledger/fabric-samples/bin:$PATH
---
查询下载好的镜像
# docker images

REPOSITORY                           TAG                 IMAGE ID            CREATED             SIZE
hyperledger/fabric-ca                1.3.0-rc1           784b38dab5ba        2 days ago          244MB
hyperledger/fabric-ca                latest              784b38dab5ba        2 days ago          244MB
hyperledger/fabric-zookeeper         0.4.12              bca71b814159        9 days ago          1.39GB
hyperledger/fabric-zookeeper         latest              bca71b814159        9 days ago          1.39GB
hyperledger/fabric-kafka             0.4.12              58b901c762ea        9 days ago          1.4GB
hyperledger/fabric-kafka             latest              58b901c762ea        9 days ago          1.4GB
hyperledger/fabric-couchdb           0.4.12              fe8d64d1233c        9 days ago          1.45GB
hyperledger/fabric-couchdb           latest              fe8d64d1233c        9 days ago          1.45GB
hyperledger/fabric-tools             1.2.0               379602873003        2 months ago        1.51GB
hyperledger/fabric-tools             latest              379602873003        2 months ago        1.51GB
hyperledger/fabric-ccenv             1.2.0               6acf31e2d9a4        2 months ago        1.43GB
hyperledger/fabric-ccenv             latest              6acf31e2d9a4        2 months ago        1.43GB
hyperledger/fabric-orderer           1.2.0               4baf7789a8ec        2 months ago        152MB
hyperledger/fabric-orderer           latest              4baf7789a8ec        2 months ago        152MB
hyperledger/fabric-peer              1.2.0               82c262e65984        2 months ago        159MB
hyperledger/fabric-peer              latest              82c262e65984        2 months ago        159MB
hyperledger/fabric-baseimage         amd64-0.4.10        62513965e238        3 months ago        1.39GB
hyperledger/fabric-baseos            amd64-0.4.10        52190e831002        3 months ago        132MB
通过脚本启动fabirc-first-network网络
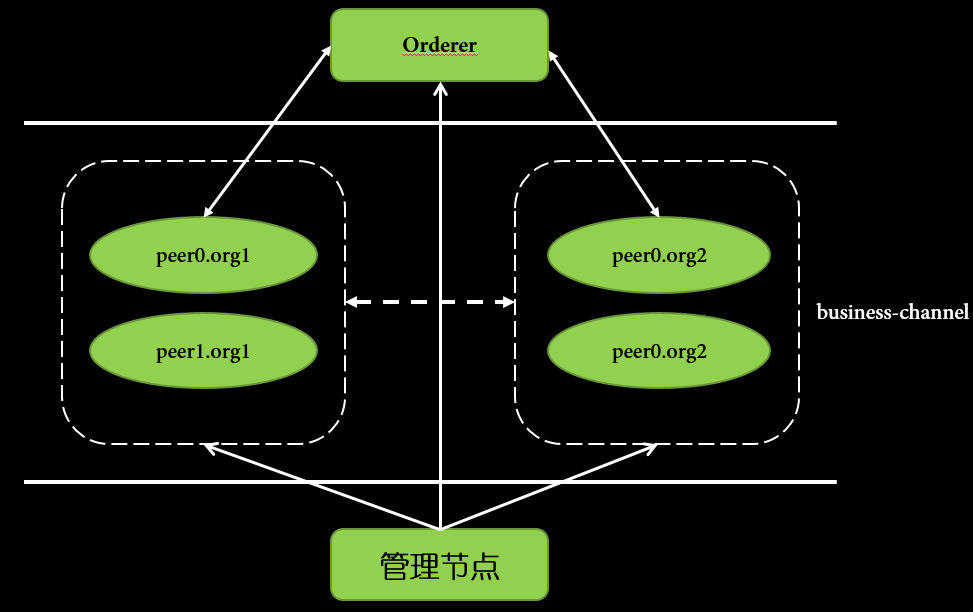
通过脚本启动fabric是比较简单的方式,这个fabric网络拓扑是最简单的网络,具体如下图所示
首先进入到first-network目录下
cd ./first-network
生成认证密钥
生成fabric-sample需要的所有的认证和密钥,以方便之后启动整个网络的时候使用
echo y | ./byfn.sh -m generate
执行结果如下
Generating certs and genesis block for channel 'mychannel' with CLI timeout of '10' seconds and CLI delay of '3' seconds
proceeding ...
/opt/go/src/github.com/hyperledger/fabric-samples/bin/cryptogen

##########################################################
##### Generate certificates using cryptogen tool #########
##########################################################
+ cryptogen generate --config=./crypto-config.yaml
org1.example.com
org2.example.com
+ res=0
+ set +x

/opt/go/src/github.com/hyperledger/fabric-samples/bin/configtxgen
##########################################################
#########  Generating Orderer Genesis block ##############
##########################################################
+ configtxgen -profile TwoOrgsOrdererGenesis -outputBlock ./channel-artifacts/genesis.block
2018-09-26 10:59:32.833 HKT [common/tools/configtxgen] main -> WARN 001 Omitting the channel ID for configtxgen is deprecated.  Explicitly passing the channel ID will be required in the future, defaulting to 'testchainid'.
2018-09-26 10:59:32.833 HKT [common/tools/configtxgen] main -> INFO 002 Loading configuration
2018-09-26 10:59:32.839 HKT [common/tools/configtxgen/encoder] NewChannelGroup -> WARN 003 Default policy emission is deprecated, please include policy specificiations for the channel group in configtx.yaml
2018-09-26 10:59:32.840 HKT [common/tools/configtxgen/encoder] NewOrdererGroup -> WARN 004 Default policy emission is deprecated, please include policy specificiations for the orderer group in configtx.yaml
2018-09-26 10:59:32.840 HKT [common/tools/configtxgen/encoder] NewOrdererOrgGroup -> WARN 005 Default policy emission is deprecated, please include policy specificiations for the orderer org group OrdererOrg in configtx.yaml
2018-09-26 10:59:32.840 HKT [msp] getMspConfig -> INFO 006 Loading NodeOUs
2018-09-26 10:59:32.840 HKT [common/tools/configtxgen/encoder] NewOrdererOrgGroup -> WARN 007 Default policy emission is deprecated, please include policy specificiations for the orderer org group Org1MSP in configtx.yaml
2018-09-26 10:59:32.840 HKT [msp] getMspConfig -> INFO 008 Loading NodeOUs
2018-09-26 10:59:32.840 HKT [common/tools/configtxgen/encoder] NewOrdererOrgGroup -> WARN 009 Default policy emission is deprecated, please include policy specificiations for the orderer org group Org2MSP in configtx.yaml
2018-09-26 10:59:32.841 HKT [common/tools/configtxgen] doOutputBlock -> INFO 00a Generating genesis block
2018-09-26 10:59:32.841 HKT [common/tools/configtxgen] doOutputBlock -> INFO 00b Writing genesis block
+ res=0
+ set +x

#################################################################
### Generating channel configuration transaction 'channel.tx' ###
#################################################################
+ configtxgen -profile TwoOrgsChannel -outputCreateChannelTx ./channel-artifacts/channel.tx -channelID mychannel
2018-09-26 10:59:32.875 HKT [common/tools/configtxgen] main -> INFO 001 Loading configuration
2018-09-26 10:59:32.882 HKT [common/tools/configtxgen] doOutputChannelCreateTx -> INFO 002 Generating new channel configtx
2018-09-26 10:59:32.882 HKT [common/tools/configtxgen/encoder] NewApplicationGroup -> WARN 003 Default policy emission is deprecated, please include policy specificiations for the application group in configtx.yaml
2018-09-26 10:59:32.882 HKT [msp] getMspConfig -> INFO 004 Loading NodeOUs
2018-09-26 10:59:32.882 HKT [common/tools/configtxgen/encoder] NewApplicationOrgGroup -> WARN 005 Default policy emission is deprecated, please include policy specificiations for the application org group Org1MSP in configtx.yaml
2018-09-26 10:59:32.882 HKT [msp] getMspConfig -> INFO 006 Loading NodeOUs
2018-09-26 10:59:32.882 HKT [common/tools/configtxgen/encoder] NewApplicationOrgGroup -> WARN 007 Default policy emission is deprecated, please include policy specificiations for the application org group Org2MSP in configtx.yaml
2018-09-26 10:59:32.883 HKT [common/tools/configtxgen] doOutputChannelCreateTx -> INFO 008 Writing new channel tx
+ res=0
+ set +x

#################################################################
#######    Generating anchor peer update for Org1MSP   ##########
#################################################################
+ configtxgen -profile TwoOrgsChannel -outputAnchorPeersUpdate ./channel-artifacts/Org1MSPanchors.tx -channelID mychannel -asOrg Org1MSP
2018-09-26 10:59:32.917 HKT [common/tools/configtxgen] main -> INFO 001 Loading configuration
2018-09-26 10:59:32.924 HKT [common/tools/configtxgen] doOutputAnchorPeersUpdate -> INFO 002 Generating anchor peer update
2018-09-26 10:59:32.924 HKT [common/tools/configtxgen] doOutputAnchorPeersUpdate -> INFO 003 Writing anchor peer update
+ res=0
+ set +x

#################################################################
#######    Generating anchor peer update for Org2MSP   ##########
#################################################################
+ configtxgen -profile TwoOrgsChannel -outputAnchorPeersUpdate ./channel-artifacts/Org2MSPanchors.tx -channelID mychannel -asOrg Org2MSP
2018-09-26 10:59:32.958 HKT [common/tools/configtxgen] main -> INFO 001 Loading configuration
2018-09-26 10:59:32.964 HKT [common/tools/configtxgen] doOutputAnchorPeersUpdate -> INFO 002 Generating anchor peer update
2018-09-26 10:59:32.965 HKT [common/tools/configtxgen] doOutputAnchorPeersUpdate -> INFO 003 Writing anchor peer update
+ res=0
+ set +x
启动fabric-sample网络
启动fabric-sample网络
echo y | ./byfn.sh -m up
如果想要使用nodejs语言或者java编写的智能合约,可以使用 -l 标志指定智能合约语言
不指定默认使用Golangecho y | ./byfn.sh -m up -l nodeecho y | ./byfn.sh -m up -l javajava在版本1.2.0以前还属于测试实验阶段,不建议使用
执行成功结果
Installing chaincode on peer1.org2...
+ peer chaincode install -n mycc -v 1.0 -l golang -p github.com/chaincode/chaincode_example02/go/
+ res=0
+ set +x
2018-09-26 03:00:38.660 UTC [chaincodeCmd] checkChaincodeCmdParams -> INFO 001 Using default escc
2018-09-26 03:00:38.660 UTC [chaincodeCmd] checkChaincodeCmdParams -> INFO 002 Using default vscc
2018-09-26 03:00:38.810 UTC [chaincodeCmd] install -> INFO 003 Installed remotely response:<status:200 payload:"OK" >
===================== Chaincode is installed on peer1.org2 =====================

Querying chaincode on peer1.org2...
===================== Querying on peer1.org2 on channel 'mychannel'... =====================
+ peer chaincode query -C mychannel -n mycc -c '{"Args":["query","a"]}'
Attempting to Query peer1.org2 ...3 secs
+ res=0
+ set +x

90
===================== Query successful on peer1.org2 on channel 'mychannel' =====================

========= All GOOD, BYFN execution completed ===========


 _____   _   _   ____
| ____| | \ | | |  _ \
|  _|   |  \| | | | | |
| |___  | |\  | | |_| |
|_____| |_| \_| |____/
执行
docker ps -a

CONTAINER ID        IMAGE                                                   COMMAND                  CREATED             STATUS        PORTS                                  NAMES
d37d3e69b469        hyperledger/fabric-tools:latest                        "/bin/bash"              14 minutes ago       Up 14 minutes                                         cli
5fa3f4446d13        hyperledger/fabric-orderer:latest                                                                      "orderer"                15 minutes ago      Up 14 minutes       0.0.0.0:7050->7050/tcp                             orderer.example.com
bc307a3fb4bd        hyperledger/fabric-peer:latest                                                                         "peer node start"        15 minutes ago      Up 14 minutes       0.0.0.0:8051->7051/tcp, 0.0.0.0:8053->7053/tcp     peer1.org1.example.com
220a1b0c964e        hyperledger/fabric-peer:latest                                                                         "peer node start"        15 minutes ago      Up 14 minutes       0.0.0.0:7051->7051/tcp, 0.0.0.0:7053->7053/tcp     peer0.org1.example.com
3e3a078b25bc        hyperledger/fabric-peer:latest                                                                         "peer node start"        15 minutes ago      Up 14 minutes       0.0.0.0:9051->7051/tcp, 0.0.0.0:9053->7053/tcp     peer0.org2.example.com
5c02ec9c1b24        hyperledger/fabric-peer:latest                                                                         "peer node start"        15 minutes ago      Up 14 minutes       0.0.0.0:10051->7051/tcp, 0.0.0.0:10053->7053/tcp   peer1.org2.example.com
会看到有一个排序节点orderer.example.com,2个组织,4个节点peer0.org1.example.com、peer0.org2.example.com、peer1.org1.example.com、peer1.org2.example.com
其中cli容器是fabric-first-network的一个客户端, 可以直接进入到cli进行操作
docker exec -it cli sh
使用bash也可以
peer channel list

2018-09-26 03:34:36.783 UTC [channelCmd] InitCmdFactory -> INFO 001 Endorser and orderer connections initialized
Channels peers has joined:
mychannel
会看到有一个channel名为mychannel,因此将这个加到环境变量中
export CHANNEL_NAME=mychannel
同时添加下列环境变量
export CORE_PEER_MSPCONFIGPATH=/opt/gopath/src/github.com/hyperledger/fabric/peer/crypto/peerOrganizations/org1.example.com/users/Admin@org1.example.com/msp
export CORE_PEER_ADDRESS=peer0.org1.example.com:7051
export CORE_PEER_LOCALMSPID="Org1MSP"
export CORE_PEER_TLS_ROOTCERT_FILE=/opt/gopath/src/github.com/hyperledger/fabric/peer/crypto/peerOrganizations/org1.example.com/peers/peer0.org1.example.com/tls/ca.crt
查询链上信息
查询a账户里面的值
peer chaincode query -C $CHANNEL_NAME -n mycc -c '{"Args":["query","a"]}'

90
这个a账户原本是有100的,在部署网络的时候执行了一次转账到b账户,因此变成了90,可以查询b的数值得到
peer chaincode query -C $CHANNEL_NAME -n mycc -c '{"Args":["query","b"]}'

210
这个信息具体可以通过如下打日志的方式查看,先退出bash或者sh,然后在宿主机执行
docker logs dev-peer0.org1.example.com-mycc-1.0

ex02 Invoke
Query Response:{"Name":"a","Amount":"100"}
ex02 Invoke
Aval = 90, Bval = 210
ex02 Invoke
Query Response:{"Name":"a","Amount":"90"}
ex02 Invoke
Query Response:{"Name":"a","Amount":"90"}
ex02 Invoke
Query Response:{"Name":"b","Amount":"210"}
docker logs dev-peer0.org2.example.com-mycc-1.0

ex02 Init
Aval = 100, Bval = 200
ex02 Invoke
Aval = 90, Bval = 21
docker logs dev-peer1.org2.example.com-mycc-1.0

ex02 Invoke
Query Response:{"Name":"a","Amount":"90"}
关闭fabric-sample网络
如果在启动网络的过程中出现了错误或者失败,则可以关闭网络重来,或者说实验完之后想删除整个实验网络,则执行如下命令,这个脚本执行会会将对应的docker容器删除,通过脚本进行实验也只是为了对这个网络的启动和关闭有一个完整的体验和感知,之后我们需要通过一些步骤来启动一个完整功能的网络
echo y | ./byfn.sh -m down
手动启动first-network
手动启动fabric-sample的first-network会对整体的一个架构有比较清晰的认识,按照手动步骤一步一步完成,能够知道脚本运行fabric网络的过程涉及到哪些具体操作
fabric-tool介绍
Crypto Generator
fabric使用cryptogen工具为网络实体生成对应的密码密钥,主要包含了x509标准的证书和签名使用的keys。这些证书其实标识了fabric网络中的不同实体,同时实体要进行通讯和交易都需要使用这些证书进行签名/校验身份。
首先需要生成对应的证书和密钥,需要使用cryptogen工具同时读取crypto-config.yaml配置文件,crypto-config.yaml文件内容如下所示
# Copyright IBM Corp. All Rights Reserved.
#
# SPDX-License-Identifier: Apache-2.0
#

# ---------------------------------------------------------------------------
# "OrdererOrgs" - Definition of organizations managing orderer nodes
# ---------------------------------------------------------------------------
OrdererOrgs:
  # ---------------------------------------------------------------------------
  # Orderer
  # ---------------------------------------------------------------------------
  - Name: Orderer
    Domain: example.com
    # ---------------------------------------------------------------------------
    # "Specs" - See PeerOrgs below for complete description
    # ---------------------------------------------------------------------------
    Specs:
      - Hostname: orderer
# ---------------------------------------------------------------------------
# "PeerOrgs" - Definition of organizations managing peer nodes
# ---------------------------------------------------------------------------
PeerOrgs:
  # ---------------------------------------------------------------------------
  # Org1
  # ---------------------------------------------------------------------------
  - Name: Org1
    Domain: org1.example.com
    EnableNodeOUs: true
    # ---------------------------------------------------------------------------
    # "Specs"
    # ---------------------------------------------------------------------------
    # Uncomment this section to enable the explicit definition of hosts in your
    # configuration.  Most users will want to use Template, below
    #
    # Specs is an array of Spec entries.  Each Spec entry consists of two fields:
    #   - Hostname:   (Required) The desired hostname, sans the domain.
    #   - CommonName: (Optional) Specifies the template or explicit override for
    #                 the CN.  By default, this is the template:
    #
    #                              "{{.Hostname}}.{{.Domain}}"
    #
    #                 which obtains its values from the Spec.Hostname and
    #                 Org.Domain, respectively.
    # ---------------------------------------------------------------------------
    # Specs:
    #   - Hostname: foo # implicitly "foo.org1.example.com"
    #     CommonName: foo27.org5.example.com # overrides Hostname-based FQDN set above
    #   - Hostname: bar
    #   - Hostname: baz
    # ---------------------------------------------------------------------------
    # "Template"
    # ---------------------------------------------------------------------------
    # Allows for the definition of 1 or more hosts that are created sequentially
    # from a template. By default, this looks like "peer%d" from 0 to Count-1.
    # You may override the number of nodes (Count), the starting index (Start)
    # or the template used to construct the name (Hostname).
    #
    # Note: Template and Specs are not mutually exclusive.  You may define both
    # sections and the aggregate nodes will be created for you.  Take care with
    # name collisions
    # ---------------------------------------------------------------------------
    Template:
      Count: 2
      # Start: 5
      # Hostname: {{.Prefix}}{{.Index}} # default
    # ---------------------------------------------------------------------------
    # "Users"
    # ---------------------------------------------------------------------------
    # Count: The number of user accounts _in addition_ to Admin
    # ---------------------------------------------------------------------------
    Users:
      Count: 1
  # ---------------------------------------------------------------------------
  # Org2: See "Org1" for full specification
  # ---------------------------------------------------------------------------
  - Name: Org2
    Domain: org2.example.com
    EnableNodeOUs: true
    Template:
      Count: 2
    Users:
      Count: 1
这个配置文件描述了first-network的网络拓扑,并且可以根据这个配置文件生成对应的证书和keys。每一个组织都被分配了一个独一无二的根证书ca-cert,这个证书会绑定到对应的组成部分上如peers和orderers。这样,整个环境就可以模拟一个联盟链的网络,这个网络里每一个成员都会有自己的认证证书,所有的交易和通讯都是会使用其中的keystore私钥来签名实例,使用signcerts这个公钥来校验。
通过cryptogen工具生成的证书和私钥等文件会创建并保存在crypto-config文件目录下,如下
# tree crypto-config/ordererOrganizations/
得到结果
crypto-config/ordererOrganizations/
└── example.com
    ├── ca
    │   ├── ca.example.com-cert.pem
    │   └── e568f6ceac08db6c113b470774fd975612adff6620d4d8747a1802559ce13820_sk
    ├── msp
    │   ├── admincerts
    │   │   └── Admin@example.com-cert.pem
    │   ├── cacerts
    │   │   └── ca.example.com-cert.pem
    │   └── tlscacerts
    │       └── tlsca.example.com-cert.pem
    ├── orderers
    │   └── orderer.example.com
    │       ├── msp
    │       │   ├── admincerts
    │       │   │   └── Admin@example.com-cert.pem
    │       │   ├── cacerts
    │       │   │   └── ca.example.com-cert.pem
    │       │   ├── keystore
    │       │   │   └── 349468c790b915b35dc6cb83f47f2f0f2eef733b359d0047c87a06d426890896_sk
    │       │   ├── signcerts
    │       │   │   └── orderer.example.com-cert.pem
    │       │   └── tlscacerts
    │       │       └── tlsca.example.com-cert.pem
    │       └── tls
    │           ├── ca.crt
    │           ├── server.crt
    │           └── server.key
    ├── tlsca
    │   ├── ac51fdfee3946e638c3f116c65b8a126e866f18a1e9688cc32f387157a36b58e_sk
    │   └── tlsca.example.com-cert.pem
    └── users
        └── Admin@example.com
            ├── msp
            │   ├── admincerts
            │   │   └── Admin@example.com-cert.pem
            │   ├── cacerts
            │   │   └── ca.example.com-cert.pem
            │   ├── keystore
            │   │   └── 2efa0e5c708509fa6d0a8c4f206f70c380d927a1d99a498d8cf50ae4ab4707e8_sk
            │   ├── signcerts
            │   │   └── Admin@example.com-cert.pem
            │   └── tlscacerts
            │       └── tlsca.example.com-cert.pem
            └── tls
                ├── ca.crt
                ├── client.crt
                └── client.key
会看到文件目录的组织关系,也会看到对于排序节点有自己的ca,所以最后排序节点的容器名称就是order.example.com,这个也就作为排序节点的MSP ID。关于MSP可以参考Membership Service Providers (MSP)
Configuration Transaction Generator
配置网络中的交易信息会用到configtxgen工具,这其中会涉及到如下几个信息的准备
- orderer
genesis block- 这个是初始区块信息, 是创世块, - channel
configuration transaction- 配置交易channel, - two
anchor peer transactions- 每一个锚节点对应一个组织Org.
orderer区块是排序服务需要使用的创世区块,而channel configuration 交易文件是用于在channel创建的时候需要广播给orderer节点的。锚节点交易用于在channel中锚定对应的组织Org中的节点。
configtxgen 使用的配置文件为configtx.yaml,内容如下:
---
Organizations:

    # SampleOrg defines an MSP using the sampleconfig.  It should never be used
    # in production but may be used as a template for other definitions
    - &OrdererOrg
        # DefaultOrg defines the organization which is used in the sampleconfig
        # of the fabric.git development environment
        Name: OrdererOrg

        # ID to load the MSP definition as
        ID: OrdererMSP

        # MSPDir is the filesystem path which contains the MSP configuration
        MSPDir: crypto-config/ordererOrganizations/example.com/msp

    - &Org1
        # DefaultOrg defines the organization which is used in the sampleconfig
        # of the fabric.git development environment
        Name: Org1MSP

        # ID to load the MSP definition as
        ID: Org1MSP

        MSPDir: crypto-config/peerOrganizations/org1.example.com/msp

        AnchorPeers:
            # AnchorPeers defines the location of peers which can be used
            # for cross org gossip communication.  Note, this value is only
            # encoded in the genesis block in the Application section context
            - Host: peer0.org1.example.com
              Port: 7051

    - &Org2
        # DefaultOrg defines the organization which is used in the sampleconfig
        # of the fabric.git development environment
        Name: Org2MSP

        # ID to load the MSP definition as
        ID: Org2MSP

        MSPDir: crypto-config/peerOrganizations/org2.example.com/msp

        AnchorPeers:
            # AnchorPeers defines the location of peers which can be used
            # for cross org gossip communication.  Note, this value is only
            # encoded in the genesis block in the Application section context
            - Host: peer0.org2.example.com
              Port: 7051
Capabilities:
    # Channel capabilities apply to both the orderers and the peers and must be
    # supported by both.  Set the value of the capability to true to require it.
    Global: &ChannelCapabilities
        # V1.1 for Global is a catchall flag for behavior which has been
        # determined to be desired for all orderers and peers running v1.0.x,
        # but the modification of which would cause incompatibilities.  Users
        # should leave this flag set to true.
        V1_1: true

    # Orderer capabilities apply only to the orderers, and may be safely
    # manipulated without concern for upgrading peers.  Set the value of the
    # capability to true to require it.
    Orderer: &OrdererCapabilities
        # V1.1 for Order is a catchall flag for behavior which has been
        # determined to be desired for all orderers running v1.0.x, but the
        # modification of which  would cause incompatibilities.  Users should
        # leave this flag set to true.
        V1_1: true

    # Application capabilities apply only to the peer network, and may be safely
    # manipulated without concern for upgrading orderers.  Set the value of the
    # capability to true to require it.
    Application: &ApplicationCapabilities
        # V1.2 for Application is a catchall flag for behavior which has been
        # determined to be desired for all peers running v1.0.x, but the
        # modification of which would cause incompatibilities.  Users should
        # leave this flag set to true.
        V1_2: true

Application: &ApplicationDefaults

    # Organizations is the list of orgs which are defined as participants on
    # the application side of the network
    Organizations:

Orderer: &OrdererDefaults

    # Orderer Type: The orderer implementation to start
    # Available types are "solo" and "kafka"
    OrdererType: solo

    Addresses:
        - orderer.example.com:7050

    # Batch Timeout: The amount of time to wait before creating a batch
    BatchTimeout: 2s

    # Batch Size: Controls the number of messages batched into a block
    BatchSize:

        # Max Message Count: The maximum number of messages to permit in a batch
        MaxMessageCount: 10

        # Absolute Max Bytes: The absolute maximum number of bytes allowed for
        # the serialized messages in a batch.
        AbsoluteMaxBytes: 99 MB

        # Preferred Max Bytes: The preferred maximum number of bytes allowed for
        # the serialized messages in a batch. A message larger than the preferred
        # max bytes will result in a batch larger than preferred max bytes.
        PreferredMaxBytes: 512 KB

    Kafka:
        # Brokers: A list of Kafka brokers to which the orderer connects
        # NOTE: Use IP:port notation
        Brokers:
            - 127.0.0.1:9092

    # Organizations is the list of orgs which are defined as participants on
    # the orderer side of the network
    Organizations:

Profiles:
    TwoOrgsOrdererGenesis:
        Capabilities:
            <<: *ChannelCapabilities
        Orderer:
            <<: *OrdererDefaults
            Organizations:
                - *OrdererOrg
            Capabilities:
                <<: *OrdererCapabilities
        Consortiums:
            SampleConsortium:
                Organizations:
                    - *Org1
                    - *Org2
    TwoOrgsChannel:
        Consortium: SampleConsortium
        Application:
            <<: *ApplicationDefaults
            Organizations:
                - *Org1
                - *Org2
            Capabilities:
                <<: *ApplicationCapabilities
这个文件定义了first-network的组织结构,包含了三个成员:一个排序组织、两个端节点组织(Org1 & Org2) - 每个组织管理了两个节点,同时配置文件也配置了一个联盟SampleConsortium,这个联盟包含了两个端节点组织,这个配置主要Profile下,有两个特别的属性,一个是TwoOrgsOrdererGenesis,另一个是TwoOrgsChannel。
使用fabric-tools构建first-network
手动使用configtxgen和cryptogen进行密钥、证书、创世块信息、channel等和byfn.sh generate的效果是一样的,因此可以通过脚本来看这部分的工作包含了那些工作。这部分工作的具体内容在byfn.sh脚本里面的方法generateCerts、replacePrivateKey、generateChannelArtifacts
手动生成证书
由于之前已经将fabric-tools的路径暴露到环境变量中了,所以可以直接使用一下的所有命令
configtxgen configtxlator cryptogen discover fabric-ca-client idemixgen orderer peer
使用cryptogen工具生成证书和密钥,会保存在crypto-config目录下
cryptogen generate --config=./crypto-config.yaml
会得到输出内容
org1.example.com
org2.example.com
之后对应的证书和私钥都会生成在crypto-config目录下
默认来说我们是在$GOPATH/src/github.com/hyperledger/fabric-samples/first-network目录下面使用configtxgen命令,但是还是建议将config.yaml文件的位置告诉configtxgen目录
export FABRIC_CFG_PATH=$PWD
接下来就使用configtxgen工具来创建创世区块信息
configtxgen -profile TwoOrgsOrdererGenesis -outputBlock ./channel-artifacts/genesis.block
输出
2018-09-28 19:31:40.406 HKT [common/tools/configtxgen] main -> WARN 001 Omitting the channel ID for configtxgen is deprecated.  Explicitly passing the channel ID will be required in the future, defaulting to 'testchainid'.
2018-09-28 19:31:40.406 HKT [common/tools/configtxgen] main -> INFO 002 Loading configuration
2018-09-28 19:31:40.417 HKT [common/tools/configtxgen/encoder] NewChannelGroup -> WARN 003 Default policy emission is deprecated, please include policy specificiations for the channel group in configtx.yaml
2018-09-28 19:31:40.417 HKT [common/tools/configtxgen/encoder] NewOrdererGroup -> WARN 004 Default policy emission is deprecated, please include policy specificiations for the orderer group in configtx.yaml
2018-09-28 19:31:40.418 HKT [common/tools/configtxgen/encoder] NewOrdererOrgGroup -> WARN 005 Default policy emission is deprecated, please include policy specificiations for the orderer org group OrdererOrg in configtx.yaml
2018-09-28 19:31:40.418 HKT [msp] getMspConfig -> INFO 006 Loading NodeOUs
2018-09-28 19:31:40.418 HKT [common/tools/configtxgen/encoder] NewOrdererOrgGroup -> WARN 007 Default policy emission is deprecated, please include policy specificiations for the orderer org group Org1MSP in configtx.yaml
2018-09-28 19:31:40.419 HKT [msp] getMspConfig -> INFO 008 Loading NodeOUs
2018-09-28 19:31:40.419 HKT [common/tools/configtxgen/encoder] NewOrdererOrgGroup -> WARN 009 Default policy emission is deprecated, please include policy specificiations for the orderer org group Org2MSP in configtx.yaml
2018-09-28 19:31:40.419 HKT [common/tools/configtxgen] doOutputBlock -> INFO 00a Generating genesis block
2018-09-28 19:31:40.419 HKT [common/tools/configtxgen] doOutputBlock -> INFO 00b Writing genesis block
这个生成的genesis.block文件内容可以通过以下命令将json保存到一个文件中然后阅读
configtxgen -inspectBlock ./channel-artifacts/genesis.block > ./channel-artifacts/genesis.json

2018-10-26 06:49:20.197 UTC [common/tools/configtxgen] main -> WARN 001 Omitting the channel ID for configtxgen is deprecated.  Explicitly passing the channel ID will be required in the future, defaulting to 'testchainid'.
2018-10-26 06:49:20.197 UTC [common/tools/configtxgen] main -> INFO 002 Loading configuration
2018-10-26 06:49:20.207 UTC [common/tools/configtxgen] doInspectBlock -> INFO 003 Inspecting block
2018-10-26 06:49:20.207 UTC [common/tools/configtxgen] doInspectBlock -> INFO 004 Parsing genesis block
文件内容包含了根据configtx.yml文件生成的创世区块信息和结点信息,内容比较多,不赘述。
创建channel的锚节点
首先创建一个channel名为mychannel,因此将mychannel作为环境变量
export CHANNEL_NAME=mychannel
使用configtxgen创建channel
configtxgen -profile TwoOrgsChannel -outputCreateChannelTx ./channel-artifacts/channel.tx \
-channelID $CHANNEL_NAME
输出
2018-09-28 19:32:32.450 HKT [common/tools/configtxgen] main -> INFO 001 Loading configuration
2018-09-28 19:32:32.457 HKT [common/tools/configtxgen] doOutputChannelCreateTx -> INFO 002 Generating new channel configtx
2018-09-28 19:32:32.457 HKT [common/tools/configtxgen/encoder] NewApplicationGroup -> WARN 003 Default policy emission is deprecated, please include policy specificiations for the application group in configtx.yaml
2018-09-28 19:32:32.458 HKT [msp] getMspConfig -> INFO 004 Loading NodeOUs
2018-09-28 19:32:32.458 HKT [common/tools/configtxgen/encoder] NewApplicationOrgGroup -> WARN 005 Default policy emission is deprecated, please include policy specificiations for the application org group Org1MSP in configtx.yaml
2018-09-28 19:32:32.458 HKT [msp] getMspConfig -> INFO 006 Loading NodeOUs
2018-09-28 19:32:32.458 HKT [common/tools/configtxgen/encoder] NewApplicationOrgGroup -> WARN 007 Default policy emission is deprecated, please include policy specificiations for the application org group Org2MSP in configtx.yaml
2018-09-28 19:32:32.459 HKT [common/tools/configtxgen] doOutputChannelCreateTx -> INFO 008 Writing new channel tx
生成的channel.tx内容获取如下
configtxgen -inspectChannelCreateTx ./channel-artifacts/channel.tx > ./channel-artifacts/channel.json

2018-10-26 06:52:58.458 UTC [common/tools/configtxgen] main -> WARN 001 Omitting the channel ID for configtxgen is deprecated.  Explicitly passing the channel ID will be required in the future, defaulting to 'testchainid'.
2018-10-26 06:52:58.458 UTC [common/tools/configtxgen] main -> INFO 002 Loading configuration
2018-10-26 06:52:58.476 UTC [common/tools/configtxgen] doInspectChannelCreateTx -> INFO 003 Inspecting transaction
2018-10-26 06:52:58.476 UTC [common/tools/configtxgen] doInspectChannelCreateTx -> INFO 004 Parsing transaction
内容如下
{
  "payload": {
    "data": {
      "config_update": {
        "channel_id": "mychannel",
        "read_set": {
          "groups": {
            "Application": {
              "groups": {
                "Org1MSP": {
                  "mod_policy": "",
                  "version": "0"
                },
                "Org2MSP": {
                  "mod_policy": "",
                  "version": "0"
                }
              },
              "mod_policy": "",
              "version": "0"
            }
          },
          "mod_policy": "",
          "values": {
            "Consortium": {
              "mod_policy": "",
              "version": "0"
            }
          },
          "version": "0"
        },
        "write_set": {
          "groups": {
            "Application": {
              "groups": {
                "Org1MSP": {
                  "mod_policy": "",
                  "version": "0"
                },
                "Org2MSP": {
                  "mod_policy": "",
                  "version": "0"
                }
              },
              "mod_policy": "Admins",
              "policies": {
                "Admins": {
                  "mod_policy": "Admins",
                  "policy": {
                    "type": 3,
                    "value": {
                      "rule": "MAJORITY",
                      "sub_policy": "Admins"
                    }
                  },
                  "version": "0"
                },
                "Readers": {
                  "mod_policy": "Admins",
                  "policy": {
                    "type": 3,
                    "value": {
                      "rule": "ANY",
                      "sub_policy": "Readers"
                    }
                  },
                  "version": "0"
                },
                "Writers": {
                  "mod_policy": "Admins",
                  "policy": {
                    "type": 3,
                    "value": {
                      "rule": "ANY",
                      "sub_policy": "Writers"
                    }
                  },
                  "version": "0"
                }
              },
              "values": {
                "Capabilities": {
                  "mod_policy": "Admins",
                  "value": {
                    "capabilities": {
                      "V1_2": {}
                    }
                  },
                  "version": "0"
                }
              },
              "version": "1"
            }
          },
          "mod_policy": "",
          "values": {
            "Consortium": {
              "mod_policy": "",
              "value": {
                "name": "SampleConsortium"
              },
              "version": "0"
            }
          },
          "version": "0"
        }
      }
    },
    "header": {
      "channel_header": {
        "channel_id": "mychannel",
        "epoch": "0",
        "timestamp": "2018-10-26T06:52:06.000Z",
        "tx_id": "",
        "type": 2,
        "version": 0
      }
    }
  }
}
接下来为Org1创建锚节点,这个锚节点是在mychannel上的
configtxgen -profile TwoOrgsChannel -outputAnchorPeersUpdate \
./channel-artifacts/Org1MSPanchors.tx -channelID $CHANNEL_NAME -asOrg Org1MSP
输出
2018-09-28 19:35:35.240 HKT [common/tools/configtxgen] main -> INFO 001 Loading configuration
2018-09-28 19:35:35.247 HKT [common/tools/configtxgen] doOutputAnchorPeersUpdate -> INFO 002 Generating anchor peer update
2018-09-28 19:35:35.247 HKT [common/tools/configtxgen] doOutputAnchorPeersUpdate -> INFO 003 Writing anchor peer update
为Org2创建锚节点
configtxgen -profile TwoOrgsChannel -outputAnchorPeersUpdate \
./channel-artifacts/Org2MSPanchors.tx -channelID $CHANNEL_NAME -asOrg Org2MSP
输出
2018-09-28 19:39:33.053 HKT [common/tools/configtxgen] main -> INFO 001 Loading configuration
2018-09-28 19:39:33.060 HKT [common/tools/configtxgen] doOutputAnchorPeersUpdate -> INFO 002 Generating anchor peer update
2018-09-28 19:39:33.060 HKT [common/tools/configtxgen] doOutputAnchorPeersUpdate -> INFO 003 Writing anchor peer update
启动network
启动网络会使用first-network目录下面的docker-compose-cli.yaml文件,这个文件描述了网络拓扑和要使用的镜像
version: '2'

# volumes目的是如果说当前docker网络中已经有以下这些容器存在,则会将原有的容器的卷内容拷贝到新的容器中进而保证原有的卷内容不会丢失
volumes:
  orderer.example.com:
  peer0.org1.example.com:
  peer1.org1.example.com:
  peer0.org2.example.com:
  peer1.org2.example.com:

# 自定义的网络,名为byfn
networks:
  byfn:

services:

  orderer.example.com:
    extends:
      file:   base/docker-compose-base.yaml # 使用docker-compose的扩展功能,这样可以将这个网络功能的具体实现与整体网络拓扑解耦开来
      service: orderer.example.com # 服务名
    container_name: orderer.example.com
    networks:
      - byfn

  peer0.org1.example.com:
    container_name: peer0.org1.example.com
    extends:
      file:  base/docker-compose-base.yaml
      service: peer0.org1.example.com
    networks:
      - byfn

  peer1.org1.example.com:
    container_name: peer1.org1.example.com
    extends:
      file:  base/docker-compose-base.yaml
      service: peer1.org1.example.com
    networks:
      - byfn

  peer0.org2.example.com:
    container_name: peer0.org2.example.com
    extends:
      file:  base/docker-compose-base.yaml
      service: peer0.org2.example.com
    networks:
      - byfn

  peer1.org2.example.com:
    container_name: peer1.org2.example.com
    extends:
      file:  base/docker-compose-base.yaml
      service: peer1.org2.example.com
    networks:
      - byfn

  cli: # cli容器没有使用docker-compose的扩展
    container_name: cli
    image: hyperledger/fabric-tools:$IMAGE_TAG
    tty: true
    stdin_open: true
    environment:
      - GOPATH=/opt/gopath
      - CORE_VM_ENDPOINT=unix:///host/var/run/docker.sock
      #- CORE_LOGGING_LEVEL=DEBUG
      - CORE_LOGGING_LEVEL=INFO
      - CORE_PEER_ID=cli
      - CORE_PEER_ADDRESS=peer0.org1.example.com:7051
      - CORE_PEER_LOCALMSPID=Org1MSP
      - CORE_PEER_TLS_ENABLED=true
      - CORE_PEER_TLS_CERT_FILE=/opt/gopath/src/github.com/hyperledger/fabric/peer/crypto/peerOrganizations/org1.example.com/peers/peer0.org1.example.com/tls/server.crt
      - CORE_PEER_TLS_KEY_FILE=/opt/gopath/src/github.com/hyperledger/fabric/peer/crypto/peerOrganizations/org1.example.com/peers/peer0.org1.example.com/tls/server.key
      - CORE_PEER_TLS_ROOTCERT_FILE=/opt/gopath/src/github.com/hyperledger/fabric/peer/crypto/peerOrganizations/org1.example.com/peers/peer0.org1.example.com/tls/ca.crt
      - CORE_PEER_MSPCONFIGPATH=/opt/gopath/src/github.com/hyperledger/fabric/peer/crypto/peerOrganizations/org1.example.com/users/Admin@org1.example.com/msp
    working_dir: /opt/gopath/src/github.com/hyperledger/fabric/peer
    command: /bin/bash
    volumes:
        - /var/run/:/host/var/run/
        - ./../chaincode/:/opt/gopath/src/github.com/chaincode
        - ./crypto-config:/opt/gopath/src/github.com/hyperledger/fabric/peer/crypto/
        - ./scripts:/opt/gopath/src/github.com/hyperledger/fabric/peer/scripts/
        - ./channel-artifacts:/opt/gopath/src/github.com/hyperledger/fabric/peer/channel-artifacts
    depends_on:
      - orderer.example.com
      - peer0.org1.example.com
      - peer1.org1.example.com
      - peer0.org2.example.com
      - peer1.org2.example.com
    networks:
      - byfn
关于文件中的扩展服务可以参考./base/docker-compose-base.yaml的内容,里面具体声明了各个节点的环境变量、挂载卷、服务暴露端口等等
接下来启动网络
docker-compose -f docker-compose-cli.yaml up -d

Creating network "net_byfn" with the default driver
Creating volume "net_peer0.org2.example.com" with default driver
Creating volume "net_peer1.org2.example.com" with default driver
Creating volume "net_peer1.org1.example.com" with default driver
Creating volume "net_peer0.org1.example.com" with default driver
Creating peer0.org1.example.com ... done
Creating cli ... done
Creating peer0.org1.example.com ...
Creating peer1.org1.example.com ...
Creating peer1.org2.example.com ...
Creating peer0.org2.example.com ...
Creating cli ...
使用-d让网络启动过程以及其中的日志内容都在容器内部完成而不是在宿主机上挂一个进程,如果说想要实时看对应的日志内容,则去除-d标志
网络启动之后查看启动的容器
docker ps -a

CONTAINER ID        IMAGE                               COMMAND             CREATED             STATUS              PORTS                                              NAMES
2b7d1e263473        hyperledger/fabric-tools:latest     "/bin/bash"         9 minutes ago       Up 9 minutes                                                           cli
95cf9a788d54        hyperledger/fabric-peer:latest      "peer node start"   9 minutes ago       Up 9 minutes        0.0.0.0:9051->7051/tcp, 0.0.0.0:9053->7053/tcp     peer0.org2.example.com
d5af3a1c1627        hyperledger/fabric-peer:latest      "peer node start"   9 minutes ago       Up 9 minutes        0.0.0.0:10051->7051/tcp, 0.0.0.0:10053->7053/tcp   peer1.org2.example.com
80e9515b06ab        hyperledger/fabric-peer:latest      "peer node start"   9 minutes ago       Up 9 minutes        0.0.0.0:7051->7051/tcp, 0.0.0.0:7053->7053/tcp     peer0.org1.example.com
9757f259a3a5        hyperledger/fabric-peer:latest      "peer node start"   9 minutes ago       Up 9 minutes        0.0.0.0:8051->7051/tcp, 0.0.0.0:8053->7053/tcp     peer1.org1.example.com
5bcae450b599        hyperledger/fabric-orderer:latest   "orderer"           9 minutes ago       Up 9 minutes        0.0.0.0:7050->7050/tcp                             orderer.example.com
环境变量
在启动了网络之后,每一个容器都会有自己对应的环境变量,这个是通过docker-compose的配置文件里面描述的。比如cli容器里面预置的环境变量
cli:
    container_name: cli
    image: hyperledger/fabric-tools:$IMAGE_TAG
    tty: true
    stdin_open: true
    environment:
      - GOPATH=/opt/gopath
      - CORE_VM_ENDPOINT=unix:///host/var/run/docker.sock
      - CORE_LOGGING_LEVEL=INFO
      - CORE_PEER_ID=cli
      - CORE_PEER_ADDRESS=peer0.org1.example.com:7051
      - CORE_PEER_LOCALMSPID=Org1MSP
      - CORE_PEER_TLS_ENABLED=true
      - CORE_PEER_TLS_CERT_FILE=/opt/gopath/src/github.com/hyperledger/fabric/peer/crypto/peerOrganizations/org1.example.com/peers/peer0.org1.example.com/tls/server.crt
      - CORE_PEER_TLS_KEY_FILE=/opt/gopath/src/github.com/hyperledger/fabric/peer/crypto/peerOrganizations/org1.example.com/peers/peer0.org1.example.com/tls/server.key
      - CORE_PEER_TLS_ROOTCERT_FILE=/opt/gopath/src/github.com/hyperledger/fabric/peer/crypto/peerOrganizations/org1.example.com/peers/peer0.org1.example.com/tls/ca.crt
      - CORE_PEER_MSPCONFIGPATH=/opt/gopath/src/github.com/hyperledger/fabric/peer/crypto/peerOrganizations/org1.example.com/users/Admin@org1.example.com/msp
然而因为cli默认配置的是peer0.org1.example.com的环境变量,因此如果想要和其他peer或者orderer节点通讯,则需要修改这些环境变量
创建并加入Channel
在之前的步骤中我们创建了channel所需文件,这个文件是通过configtxgen工具结合configtx.yaml文件生成的。因此可以重复之前的步骤,但是使用不同的profile来创建另一个channel的文件.
因为已经有了channel创建所需文件,现在首先需要创建channel,进入到cli容器中
docker exec -it cli bash
进入到容器之后,查看各个环境变量
echo $CORE_PEER_MSPCONFIGPATH && \
echo $CORE_PEER_ADDRESS && \
echo $CORE_PEER_LOCALMSPID && \
echo $CORE_PEER_TLS_ROOTCERT_FILE
内容应该和下面一样
CORE_PEER_MSPCONFIGPATH=/opt/gopath/src/github.com/hyperledger/fabric/peer/crypto/peerOrganizations/org1.example.com/users/Admin@org1.example.com/msp
CORE_PEER_ADDRESS=peer0.org1.example.com:7051
CORE_PEER_LOCALMSPID="Org1MSP"
CORE_PEER_TLS_ROOTCERT_FILE=/opt/gopath/src/github.com/hyperledger/fabric/peer/crypto/peerOrganizations/org1.example.com/peers/peer0.org1.example.com/tls/ca.crt
如果环境变量没问题,接下来我们就可以用之前生成的channel交易配置文件chennel.tx提交到排序节点orderer,一次来创建一个channel
首先来看一下peer channel create的帮助清单
# peer channel create --help

Create a channel and write the genesis block to a file.

Usage:
  peer channel create [flags]

Flags:
  -c, --channelID string     In case of a newChain command, the channel ID to create. It must be all lower case, less than 250 characters long and match the regular expression: [a-z][a-z0-9.-]*
  -f, --file string          Configuration transaction file generated by a tool such as configtxgen for submitting to orderer
  -h, --help                 help for create
      --outputBlock string   The path to write the genesis block for the channel. (default ./<channelID>.block)
  -t, --timeout duration     Channel creation timeout (default 5s)

Global Flags:
      --cafile string                       Path to file containing PEM-encoded trusted certificate(s) for the ordering endpoint
      --certfile string                     Path to file containing PEM-encoded X509 public key to use for mutual TLS communication with the orderer endpoint
      --clientauth                          Use mutual TLS when communicating with the orderer endpoint
      --connTimeout duration                Timeout for client to connect (default 3s)
      --keyfile string                      Path to file containing PEM-encoded private key to use for mutual TLS communication with the orderer endpoint
      --logging-level string                Default logging level and overrides, see core.yaml for full syntax
  -o, --orderer string                      Ordering service endpoint
      --ordererTLSHostnameOverride string   The hostname override to use when validating the TLS connection to the orderer.
      --tls                                 Use TLS when communicating with the orderer endpoint
创建名为mychannel的channel
export CHANNEL_NAME=mychannel

peer channel create -o orderer.example.com:7050 -c $CHANNEL_NAME -f ./channel-artifacts/channel.tx --tls --cafile /opt/gopath/src/github.com/hyperledger/fabric/peer/crypto/ordererOrganizations/example.com/orderers/orderer.example.com/msp/tlscacerts/tlsca.example.com-cert.pem

2018-10-26 09:19:12.061 UTC [channelCmd] InitCmdFactory -> INFO 001 Endorser and orderer connections initialized
2018-10-26 09:19:12.158 UTC [cli/common] readBlock -> INFO 002 Got status: &{NOT_FOUND}
2018-10-26 09:19:12.168 UTC [channelCmd] InitCmdFactory -> INFO 003 Endorser and orderer connections initialized
2018-10-26 09:19:12.378 UTC [cli/common] readBlock -> INFO 004 Received block: 0
这里使用--cafile参数指明开启了TLS交互模式,如果不开启直接不添加这一项即可
查看这个channel是否创建好
peer channel list

2018-10-26 09:19:56.065 UTC [channelCmd] InitCmdFactory -> INFO 001 Endorser and orderer connections initialized
Channels peers has joined:
会看到现在并没有任何channel信息,这是因为当前节点peer0.org1.example.com并没有加入到这个channel中,而这个时候因为通过这个节点向排序节点提交了创建channel的请求,因此在当前目录下会有一个mychannel.block的创世区块文件,这个区块文件包含了channel.tx文件里面包含的配置信息,具体信息想要查看可以通过configtxgen -inspectBlock mychannel.block
ls

channel-artifacts  crypto  mychannel.block  scripts
使用这个区块文件将当前节点peer0.org1.example.com加入到channel中
peer channel join -b mychannel.block

2018-10-26 09:29:19.430 UTC [channelCmd] InitCmdFactory -> INFO 001 Endorser and orderer connections initialized
2018-10-26 09:29:19.501 UTC [channelCmd] executeJoin -> INFO 002 Successfully submitted proposal to join channel
查看channel是否创建好
# peer channel list

2018-10-26 09:29:33.594 UTC [channelCmd] InitCmdFactory -> INFO 001 Endorser and orderer connections initialized
Channels peers has joined:
mychannel
同样也可以将别的节点添加到这个通道中,只需要修改对应的环境变量。比如将peer0.org2.example.com加入到通道中
CORE_PEER_MSPCONFIGPATH=/opt/gopath/src/github.com/hyperledger/fabric/peer/crypto/peerOrganizations/org2.example.com/users/Admin@org2.example.com/msp \
CORE_PEER_ADDRESS=peer0.org2.example.com:7051 CORE_PEER_LOCALMSPID="Org2MSP" \
CORE_PEER_TLS_ROOTCERT_FILE=/opt/gopath/src/github.com/hyperledger/fabric/peer/crypto/peerOrganizations/org2.example.com/peers/peer0.org2.example.com/tls/ca.crt \
peer channel join -b mychannel.block
这里的环境变量是临时覆盖了默认环境变量,因此在执行完成之后对应的环境变量不会改变
更新锚节点
接下来更新channel来添加锚节点信息,对channel的更新会传播给所有加入通道的节点,这边更新channel其实只是在原有的channel中的创世块上添加信息,当然并不是修改了这个创世块,而是在创世块的基础上添加信息,这个信息便是锚节点的信息
在peer0.org1.example.com上更新锚节点信息,这个更新操作会为Org1定义对应的节点为peer0.org1.example.com
peer channel update -o orderer.example.com:7050 -c $CHANNEL_NAME -f ./channel-artifacts/Org1MSPanchors.tx --tls \
--cafile /opt/gopath/src/github.com/hyperledger/fabric/peer/crypto/ordererOrganizations/example.com/orderers/orderer.example.com/msp/tlscacerts/tlsca.example.com-cert.pem

2018-10-29 02:55:47.959 UTC [channelCmd] InitCmdFactory -> INFO 001 Endorser and orderer connections initialized
2018-10-29 02:55:48.021 UTC [channelCmd] update -> INFO 002 Successfully submitted channel update
接下来为Org2定义锚节点peer0.org2.example.com,和之前加入到channel一样,需要设置临时环境变量
CORE_PEER_MSPCONFIGPATH=/opt/gopath/src/github.com/hyperledger/fabric/peer/crypto/peerOrganizations/org2.example.com/users/Admin@org2.example.com/msp \
CORE_PEER_ADDRESS=peer0.org2.example.com:7051 CORE_PEER_LOCALMSPID="Org2MSP" \
CORE_PEER_TLS_ROOTCERT_FILE=/opt/gopath/src/github.com/hyperledger/fabric/peer/crypto/peerOrganizations/org2.example.com/peers/peer0.org2.example.com/tls/ca.crt \
peer channel update -o orderer.example.com:7050 -c $CHANNEL_NAME -f ./channel-artifacts/Org2MSPanchors.tx --tls \
--cafile /opt/gopath/src/github.com/hyperledger/fabric/peer/crypto/ordererOrganizations/example.com/orderers/orderer.example.com/msp/tlscacerts/tlsca.example.com-cert.pem

2018-10-29 03:03:39.342 UTC [channelCmd] InitCmdFactory -> INFO 001 Endorser and orderer connections initialized
2018-10-29 03:03:39.385 UTC [channelCmd] update -> INFO 002 Successfully submitted channel update
安装并初始化链码
基本环境已经准备好了,接下来进行链码的安装。在这里我们使用链码是first-network使用的chaincode-example。如果想要学习怎么写一个自己的链码,可以参考Chaincode for Developers
这里我们使用golang语言开发的智能合约,内容如下
chaincode-example02.go
package main

import (
    "fmt"
    "strconv"

    "github.com/hyperledger/fabric/core/chaincode/shim"
    pb "github.com/hyperledger/fabric/protos/peer"
)

// SimpleChaincode example simple Chaincode implementation
type SimpleChaincode struct {
}

func (t *SimpleChaincode) Init(stub shim.ChaincodeStubInterface) pb.Response {
    fmt.Println("ex02 Init")
    _, args := stub.GetFunctionAndParameters()
    var A, B string    // Entities
    var Aval, Bval int // Asset holdings
    var err error

    if len(args) != 4 {
        return shim.Error("Incorrect number of arguments. Expecting 4")
    }

    // Initialize the chaincode
    A = args[0]
    Aval, err = strconv.Atoi(args[1])
    if err != nil {
        return shim.Error("Expecting integer value for asset holding")
    }
    B = args[2]
    Bval, err = strconv.Atoi(args[3])
    if err != nil {
        return shim.Error("Expecting integer value for asset holding")
    }
    fmt.Printf("Aval = %d, Bval = %d\n", Aval, Bval)

    // Write the state to the ledger
    err = stub.PutState(A, []byte(strconv.Itoa(Aval)))
    if err != nil {
        return shim.Error(err.Error())
    }

    err = stub.PutState(B, []byte(strconv.Itoa(Bval)))
    if err != nil {
        return shim.Error(err.Error())
    }

    return shim.Success(nil)
}

func (t *SimpleChaincode) Invoke(stub shim.ChaincodeStubInterface) pb.Response {
    fmt.Println("ex02 Invoke")
    function, args := stub.GetFunctionAndParameters()
    if function == "invoke" {
        // Make payment of X units from A to B
        return t.invoke(stub, args)
    } else if function == "delete" {
        // Deletes an entity from its state
        return t.delete(stub, args)
    } else if function == "query" {
        // the old "Query" is now implemtned in invoke
        return t.query(stub, args)
    }

    return shim.Error("Invalid invoke function name. Expecting \"invoke\" \"delete\" \"query\"")
}

// Transaction makes payment of X units from A to B
func (t *SimpleChaincode) invoke(stub shim.ChaincodeStubInterface, args []string) pb.Response {
    var A, B string    // Entities
    var Aval, Bval int // Asset holdings
    var X int          // Transaction value
    var err error

    if len(args) != 3 {
        return shim.Error("Incorrect number of arguments. Expecting 3")
    }

    A = args[0]
    B = args[1]

    // Get the state from the ledger
    // TODO: will be nice to have a GetAllState call to ledger
    Avalbytes, err := stub.GetState(A)
    if err != nil {
        return shim.Error("Failed to get state")
    }
    if Avalbytes == nil {
        return shim.Error("Entity not found")
    }
    Aval, _ = strconv.Atoi(string(Avalbytes))

    Bvalbytes, err := stub.GetState(B)
    if err != nil {
        return shim.Error("Failed to get state")
    }
    if Bvalbytes == nil {
        return shim.Error("Entity not found")
    }
    Bval, _ = strconv.Atoi(string(Bvalbytes))

    // Perform the execution
    X, err = strconv.Atoi(args[2])
    if err != nil {
        return shim.Error("Invalid transaction amount, expecting a integer value")
    }
    Aval = Aval - X
    Bval = Bval + X
    fmt.Printf("Aval = %d, Bval = %d\n", Aval, Bval)

    // Write the state back to the ledger
    err = stub.PutState(A, []byte(strconv.Itoa(Aval)))
    if err != nil {
        return shim.Error(err.Error())
    }

    err = stub.PutState(B, []byte(strconv.Itoa(Bval)))
    if err != nil {
        return shim.Error(err.Error())
    }

    return shim.Success(nil)
}

// Deletes an entity from state
func (t *SimpleChaincode) delete(stub shim.ChaincodeStubInterface, args []string) pb.Response {
    if len(args) != 1 {
        return shim.Error("Incorrect number of arguments. Expecting 1")
    }

    A := args[0]

    // Delete the key from the state in ledger
    err := stub.DelState(A)
    if err != nil {
        return shim.Error("Failed to delete state")
    }

    return shim.Success(nil)
}

// query callback representing the query of a chaincode
func (t *SimpleChaincode) query(stub shim.ChaincodeStubInterface, args []string) pb.Response {
    var A string // Entities
    var err error

    if len(args) != 1 {
        return shim.Error("Incorrect number of arguments. Expecting name of the person to query")
    }

    A = args[0]

    // Get the state from the ledger
    Avalbytes, err := stub.GetState(A)
    if err != nil {
        jsonResp := "{\"Error\":\"Failed to get state for " + A + "\"}"
        return shim.Error(jsonResp)
    }

    if Avalbytes == nil {
        jsonResp := "{\"Error\":\"Nil amount for " + A + "\"}"
        return shim.Error(jsonResp)
    }

    jsonResp := "{\"Name\":\"" + A + "\",\"Amount\":\"" + string(Avalbytes) + "\"}"
    fmt.Printf("Query Response:%s\n", jsonResp)
    return shim.Success(Avalbytes)
}

func main() {
    err := shim.Start(new(SimpleChaincode))
    if err != nil {
        fmt.Printf("Error starting Simple chaincode: %s", err)
    }
}
安装
peer chaincode install -n mycc -v 1.0 -p github.com/chaincode/chaincode_example02/go/

2018-10-29 03:20:15.434 UTC [chaincodeCmd] checkChaincodeCmdParams -> INFO 001 Using default escc
2018-10-29 03:20:15.434 UTC [chaincodeCmd] checkChaincodeCmdParams -> INFO 002 Using default vscc
2018-10-29 03:20:16.800 UTC [chaincodeCmd] install -> INFO 003 Installed remotely response:<status:200 payload:"OK" >
接下来需要初始化链码,虽然安装了链码,但是这个链码只是在节点peer0.org1.example.com上安装了,并没有初始化到对应某一个通道中,因此需要初始化。在初始化过程中,会定一个背书策略,背书策略规定了我们之后的链码调用需要得到对应节点的背书才能通过。比如策略-P "AND ('Org1MSP.peer','Org2MSP.peer')"意味着需要来自Org1和Org2两个组织中的节点背书才能将对应的交易通过。
peer chaincode instantiate -o orderer.example.com:7050 --tls -C $CHANNEL_NAME -n mycc -v 1.0 -c '{"Args":["init","a", "100", "b","200"]}' -P "AND ('Org1MSP.peer','Org2MSP.peer')" \
--cafile /opt/gopath/src/github.com/hyperledger/fabric/peer/crypto/ordererOrganizations/example.com/orderers/orderer.example.com/msp/tlscacerts/tlsca.example.com-cert.pem

2018-10-29 03:25:22.427 UTC [chaincodeCmd] checkChaincodeCmdParams -> INFO 001 Using default escc
2018-10-29 03:25:22.432 UTC [chaincodeCmd] checkChaincodeCmdParams -> INFO 002 Using default vscc
执行过程会消耗一点时间,因为这个过程中需要启动一个dev-peer0.org1.example.com-mycc-1.0的容器,这个容器便是我们链码初始化之后生成的。可以通过docker ps -a查看
CONTAINER ID        IMAGE                                                                                                      COMMAND                                    NAMES
3e63a59498b3        dev-peer0.org1.example.com-mycc-1.0-384f11f484b9302df90b453200cfb25174305fce8f53f4e94d45ee3b6cab0ce9   "chaincode -peer.a..."      dev-peer0.org1.example.com-mycc-1.0
如果想要更多的节点和账本交互,则需要将不同的节点都加入到channel中,然后使用同一个链码名称、版本和语言安装链码。
比如在节点peer0.org2.example.com上执行
CORE_PEER_MSPCONFIGPATH=/opt/gopath/src/github.com/hyperledger/fabric/peer/crypto/peerOrganizations/org2.example.com/users/Admin@org2.example.com/msp \
CORE_PEER_ADDRESS=peer0.org2.example.com:7051 CORE_PEER_LOCALMSPID="Org2MSP" \
CORE_PEER_TLS_ROOTCERT_FILE=/opt/gopath/src/github.com/hyperledger/fabric/peer/crypto/peerOrganizations/org2.example.com/peers/peer0.org2.example.com/tls/ca.crt \
peer chaincode install -n mycc -v 1.0 -p github.com/chaincode/chaincode_example02/go/

2018-10-29 09:24:52.104 UTC [chaincodeCmd] checkChaincodeCmdParams -> INFO 001 Using default escc
2018-10-29 09:24:52.105 UTC [chaincodeCmd] checkChaincodeCmdParams -> INFO 002 Using default vscc

2018-10-29 09:24:55.047 UTC [chaincodeCmd] install -> INFO 003 Installed remotely response:<status:200 payload:"OK" >
安装好之后在Org2上的peer0便可以执行账本交互
调用链码
执行查询
peer chaincode query -C $CHANNEL_NAME -n mycc -c '{"Args":["query", "a"]}'

100
在peer0.org2.example.com上执行查询
CORE_PEER_MSPCONFIGPATH=/opt/gopath/src/github.com/hyperledger/fabric/peer/crypto/peerOrganizations/org2.example.com/users/Admin@org2.example.com/msp \
CORE_PEER_ADDRESS=peer0.org2.example.com:7051 CORE_PEER_LOCALMSPID="Org2MSP" \
CORE_PEER_TLS_ROOTCERT_FILE=/opt/gopath/src/github.com/hyperledger/fabric/peer/crypto/peerOrganizations/org2.example.com/peers/peer0.org2.example.com/tls/ca.crt \
peer chaincode query -C $CHANNEL_NAME -n mycc -c '{"Args":["query", "a"]}'
执行invoke方法,修改账本状态
peer chaincode invoke -o orderer.example.com:7050 --tls true -C $CHANNEL_NAME -n mycc \
--cafile /opt/gopath/src/github.com/hyperledger/fabric/peer/crypto/ordererOrganizations/example.com/orderers/orderer.example.com/msp/tlscacerts/tlsca.example.com-cert.pem \
--peerAddresses peer0.org1.example.com:7051 \
--tlsRootCertFiles /opt/gopath/src/github.com/hyperledger/fabric/peer/crypto/peerOrganizations/org1.example.com/peers/peer0.org1.example.com/tls/ca.crt \
--peerAddresses peer0.org2.example.com:7051 \
--tlsRootCertFiles /opt/gopath/src/github.com/hyperledger/fabric/peer/crypto/peerOrganizations/org2.example.com/peers/peer0.org2.example.com/tls/ca.crt \
-c '{"Args":["invoke","a","b","10"]}'

2018-10-29 11:08:21.386 UTC [chaincodeCmd] chaincodeInvokeOrQuery -> INFO 001 Chaincode invoke successful. result: status:200
执行完成之后观察账本中A的资产
peer chaincode query -C $CHANNEL_NAME -n mycc -c '{"Args":["query", "a"]}'

90
总结
first-network拓扑比较简单,暂时还没有涉及到太多的节点,也没有涉及到共识机制的部分,是一个相对比较简单的入门级别的网络。对于理解一个fabric网络中包含什么内容有很大的帮助。
链码部分包含了golang、nodejs、java等,目前比较成熟的是golang和nodejs的链码,建议使用golang。
手动启动网络并且使用fabric-tools的内容比较重要,在将来进行多节点部署的时候会再次用到。